How to make a willow shave by Eric Franklin
20th May, 2023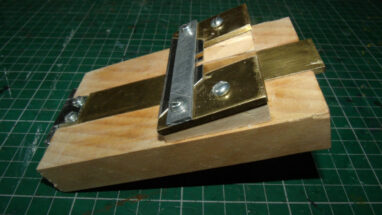

After our recent focus on tools in issue 183 of the BA Journal, we received details on how to make a willow shave from Eric Franklin, husband of BA member Helen Franklin.
Eric writes: “My degree was in biochemistry, which took me through a career in pharmaceuticals through teaching including adult education, to retirement. During that period I became a player of lutes and Northumbrian smallpipes, both expensive to purchase and service. I learned how to make reeds, refurbish pipes and, later, to make my own lutes. With my increasing range of tools and skills my wife asked me to turn my hands to her needs, and later my longbow toting colleague requested the same.
My wife is the family basketmaker, but the request for a willow shave came from a fellow wielder of the longbow, who had already asked me to turn a couple of splitters.”
I looked at photographs of what seemed a rather crude shave and mused on the matter of sharpening the blade when it needed doing. It struck me that I could replace this blade with a mounting that could hold the ubiquitous, disposable Stanley blade, permitting reloading rather than sharpening.
Materials
• Simple hand tools including a sharp block plane and chisels
• Block of sturdy workable wood such as beech, maple, sycamore or lime
• Four dome-headed M3 engineering screws plus a ‘tap’ for the thread
• Two dome-headed 2.5cm woodscrews
• Sheet brass 3mm thick
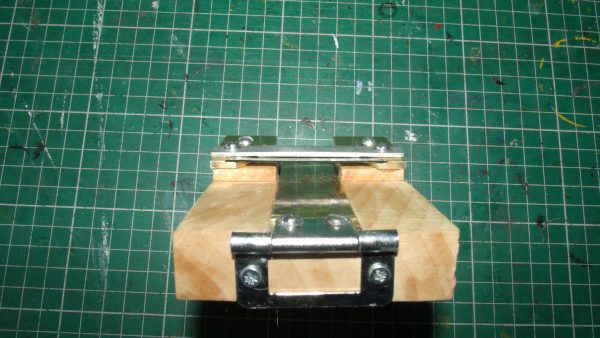
• Cranked hinge with mounting screws
• M5 bolt and long threaded nut for the brass baseplate adjuster
Construction
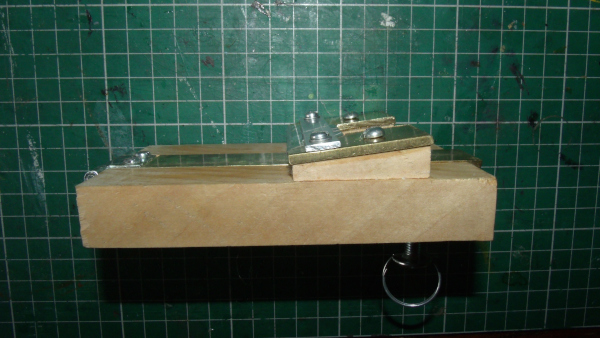
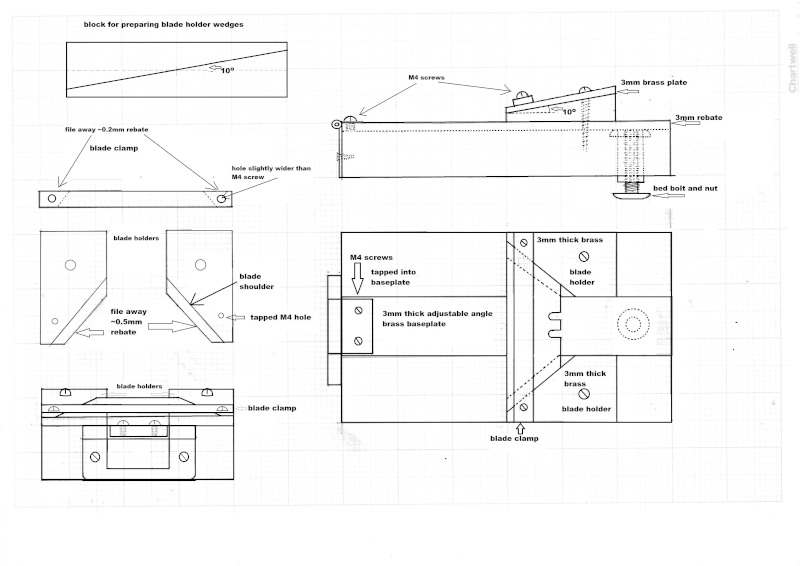
The wood for the base needs to be sturdy but capable of being cut and cleaned with a sharp chisel. Cut a block 12cm x 7cm x 2cm and then mark and cut two slots just a little wider apart than the inner component of the cranked hinge (a look at the photographs and plans will explain what I mean) and 3mm deep. Now remove the wood from between these cuts with a sharp chisel until the channel is the depth of the brass ‘bed’ you mean to use. Ensure that it is flat and level.
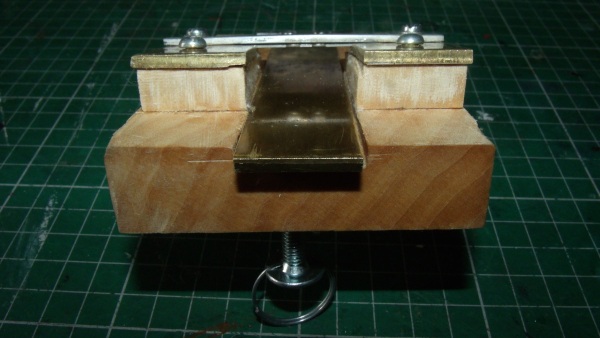
I have some 3mm thick brass which is sturdy enough not to bend in use; avoid aluminium which is softer and tends to mark hands and work grey. Next cut a strip of this brass a millimetre or two narrower than the channel, mark where the hinge and screws will attach and drill and tap holes for the M3 screws. Smear a little Araldite into the threads and screw them in tight. Once the glue is hard, saw off the protruding ends and file smooth.
Now drill the hole for the M5 bolt and its nut wide enough for the latter to key into the block. I’ve used a fitting from a bed frame as the ‘nut,’ which is a 2.5cm threaded tube ensuring less ‘wobble’ of the bolt than a conventional hexagonal nut.
The tube needed some preparation. I mounted it in the lathe chuck and drilled through the Allen screw head just into the threaded bore. Next, I used an appropriate tap to cut the remaining thread from the back of the nut to ensure that it was continuous. Then I countersunk the nut level with the top of the channel and smeared a little Araldite around it as I tapped it home, taking care to keep adhesive clear of the threads. In the absence of a bed bolt it’s possible to exercise a little ingenuity and to gang a pair of conventional nuts top and bottom of the drilled hole.
Chisel a countersink for the ‘hex’ shape into the upper face of the block; add some glue and tap the nut in place. Once set, thread a second nut on to the bolt close to its head. Prepare a second ‘hex’ countersink in the block’s lower face. Add some glue and then tighten the bolt down on the first nut until it forces the second nut in place. Leave it to set. Needless to say, keep glue off the threads.
Next attach the hinge to the end of the block with the woodscrews provided, checking that it lifts and falls uninterruptedly.
Prepare a 8cm x 2.5cm x 2cm wood block and mark a central line along the principal axis. Mark the centre point of it and from this centre draw a second line at 10o to it to form a diagonal along the principal axis; it won’t go through the corners. Mark right angles on the block ends to ensure the subsequent sawcut along this line is as neat as possible.
Butt the pieces side by side so that the slopes and bases coincide. The ends don’t matter at this stage. Clamp them in your vice and plane the sloping faces precisely smooth and level. Bind them with a turn or two of tape and mark where the wedges are 4mm or 5mm thick, depending on the maximum willow thickness you are going to work with. Put a second mark 4cm back along the wedge from this first one. Mark right angles from the base and cut with the saw.
These wedges will form the angle of the blade holder. Mark a line right across the main block 2cm from its rear and glue the wedges to it, ensuring that the brass bed is free to move fully and freely between them. Let them set.
Cut two pieces of 3mm brass to the same dimensions as the upper faces of the wedges – 4cm x approx. 2.5cm. Tape them temporarily to the wedges and use a Stanley blade to establish the angle of the blade’s shoulders (see plan). Mark a second line 3mm inside this one, closer to the channel. This will establish the blade guide angle and clamp position.
Remove the tape and file about 0.5mm of brass thickness away from between these two lines, enough to bed the blade securely. Mark drilling points for the mounting screws and the blade clamp screws and carefully drill out. The blade clamp screw holes will need to be tapped for M3 dome headed screws; go carefully, especially at the start.
Next the screws will need to be cut short to the thickness of the brass plus the thickness of the blade clamp (and washer if you fit one). The blade clamp is made of another piece of brass or aluminium, which needn’t be as thick as 3mm but the hole diameters should to be a little wider to enable the screws to pass through freely. Mount the blade between the two parts of the blade holder and clamp it with blade clamp and screws. If the blade is loose, file a little from the bottom, outside edges of the clamp (see plan) to ensure the blade is held tight.
Place the blade assembly on the wedges and mark and drill the mounting holes (off the wedges, in a vice). Smear some Araldite on the tops of the wedges and screw the whole blade unit down tightly. Remove the blade clamp, blade and screws and allow the adhesive to set. While fresh, clean off any Araldite on the clamp screws with white spirit or lighter fluid.
When set, proof the wood with wax or waterproof varnish and reinstall the blade, clamp and screws. Use it in the conventional fashion.
Eric Franklin
Download pdf instructions for the willow shave here